 MANSOQ
 Clinical care
Create an encounter
Start an encounter from a patient or appointment with the correct care setting, date, status and department.
Current source · source reviewed · 4 min read
Before you begin
- The patient is registered in MANSOQ, and you have opened the patient at the facility.
- If you start the encounter from an appointment, the patient has a booked or checked-in appointment at that facility.
- You have the permissions listed below.
1. Open the encounter form
You can open the form from four places.
From the patient page. Open the patient at the facility. Select the Create Encounter quick action. Keyboard shortcut: e.
From the patient's Encounters tab. Open the patient. Go to the Encounters tab. Select Create Encounter. This action appears when the patient has no encounter yet.
From an appointment, with Start Consultation. Open the appointment page. In Quick Actions, select Start Consultation. Keyboard shortcut: 1. MANSOQ opens the form with the status set to In Progress. MANSOQ also links the encounter to the appointment. When you confirm, MANSOQ moves the appointment to In Consultation.
Note: If the appointment already has an encounter, Start Consultation does not open the form. MANSOQ moves the appointment to In Consultation. MANSOQ then opens the existing encounter on its Overview tab.
From an appointment, with Create Planned Encounter. In the same Quick Actions panel, select Create Planned Encounter. Keyboard shortcut: 2. MANSOQ opens the form with the status set to Planned.
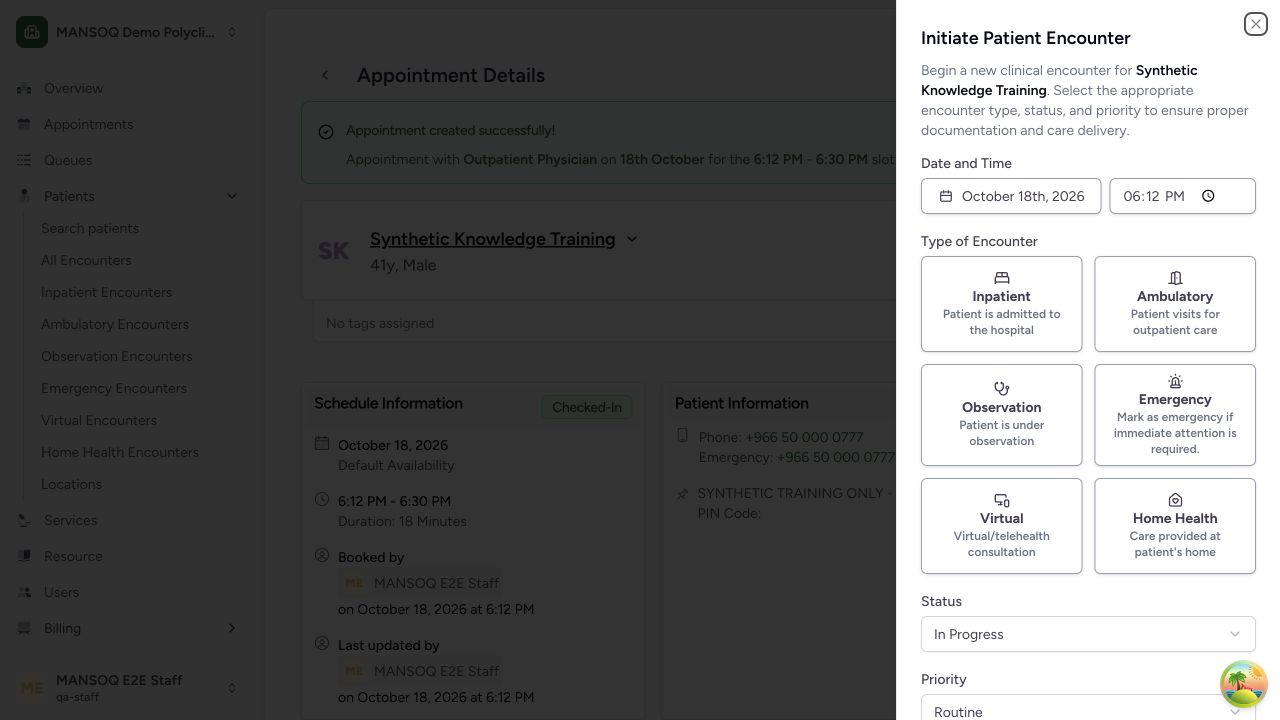
The form is titled Initiate Patient Encounter. Below the title, MANSOQ shows "Begin a new clinical encounter for" and the name of the patient.
2. Complete the form
Complete the fields in the order they appear.
| Component | What it captures |
|---|---|
| Date and Time (required) | The date and the time the encounter starts. You can pick a future date only when the status is Planned. |
| Type of Encounter (required) | The kind of care the patient receives. Select one tile. See the tile list below. |
| Status (required) | The state of the encounter. Choose In Progress, Planned or On Hold. These are the only statuses you can set at creation. |
| Priority (required) | How urgent the encounter is. MANSOQ preselects Routine. For the full list, see Encounter. |
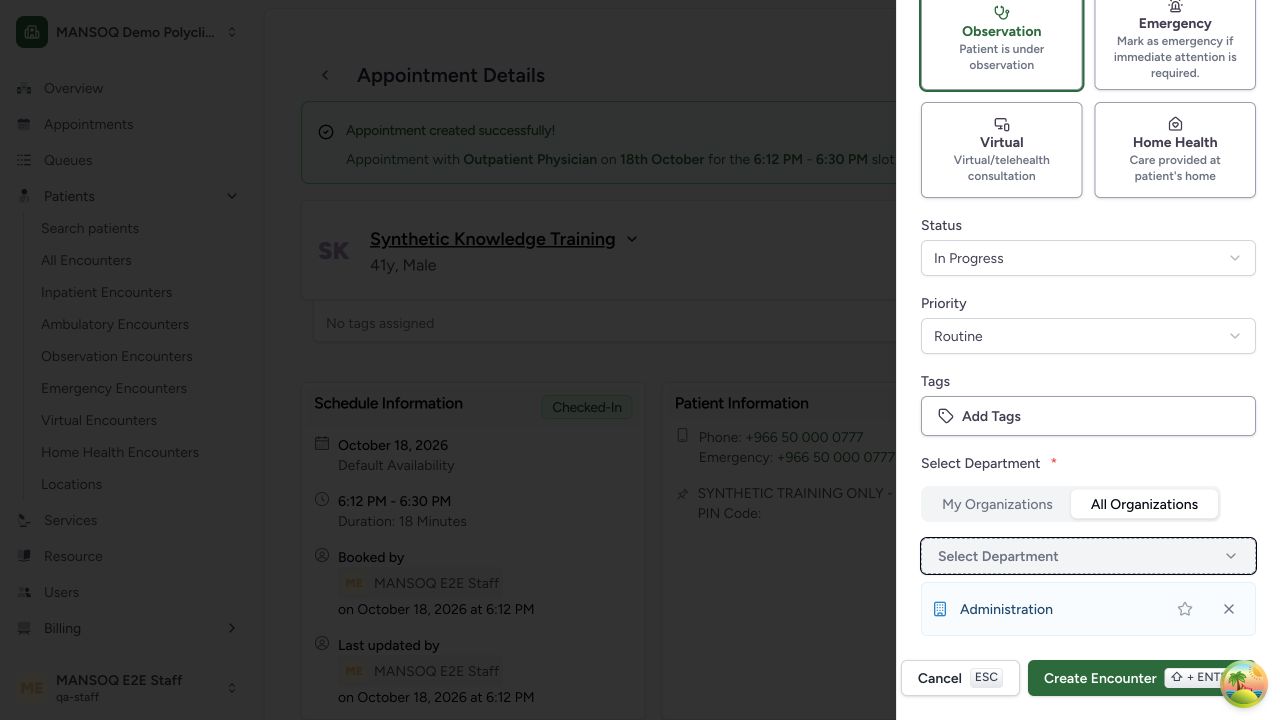
| Tags (optional) | One or more tags that your facility configured for encounters. |
| Departments (required) | The departments that look after the patient. Select at least one department. Departments control who can see the encounter. |
Each Type of Encounter tile carries a short description.
| Type of Encounter | Description |
|---|---|
| Inpatient | Patient is admitted to the hospital. |
| Ambulatory | Patient visits for outpatient care. |
| Observation | Patient is under observation. |
| Emergency | Mark as emergency if immediate attention is required. |
| Virtual | Virtual/telehealth consultation. |
| Home Health | Care provided at patient's home. |
Note: Which encounter types you can choose, and which type MANSOQ preselects, depend on your deployment's configuration.
3. Save the encounter
Select Create Encounter. The button shows "Creating…" while MANSOQ saves the encounter. To close the form without saving, select Cancel.
If MANSOQ shows an error, correct the entry and save again.
| Message | What to do |
|---|---|
| Future date is only allowed for planned encounters | The start date is in the future, but the status is not Planned. Move the date back, or set the status to Planned. |
| At least one department is required | Select a department. The Create Encounter button stays disabled until you select one. |
| Patient already has maximum number of active encounters (5) in the facility | The patient already has the maximum number of open encounters at this facility. Close one of them, or continue in the existing encounter. |
| Encounter already has an associated booking | The appointment you started from already has an encounter. Open that encounter instead. |
Note: The maximum number of open encounters per patient at a facility depends on your deployment's configuration. The default maximum is 5.
Permissions
Encounter creation is enforced by the server and the department/organization role configuration. A visible Start Consultation or Create Encounter action does not prove permission. In the isolated role test, Staff could open the form but received You do not have permission to create encounter; Doctor successfully created the encounter. Verify the actual assigned role and department rather than relying on a role name alone.
Expected Outcome
- MANSOQ shows the message "Encounter created successfully".
- MANSOQ opens the new encounter on its Overview tab.
Version and facility configuration
This procedure is grounded in the repository’s version 3.1 user guide and the audited source revision. Available encounter types, required demographics, terminology, permissions and enabled services depend on your facility configuration. Use the labels and access controls on your own instance; the source references below identify the documented implementation.
Troubleshooting
Future date is only allowed for planned encounters
Move the start date back, or set Status to Planned.
At least one department is required
Select at least one department. The Create Encounter button remains disabled without it.
Patient already has maximum number of active encounters
Continue the appropriate open encounter or complete one under facility policy. The configured default maximum is five per patient at a facility.
You do not have permission to create encounter
Use an authorized clinical role with the required encounter-create permission in the selected department. Registration and appointment access alone do not grant clinical encounter creation. Do not retry with another patient record.
Source evidence
References are pinned to the private MANSOQ source repository. Repository access is required to open these links.
- repositories/platform/mansoq-documentation/versioned_docs/version-3.1/flows/clinical/encounter/create-encounter.mdx:5 · f6e9f05f
- repositories/platform/mansoq-web/src/components/Encounter/CreateEncounterForm.tsx:73 · f6e9f05f
- repositories/platform/mansoq-documentation/versioned_docs/version-3.1/flows/clinical/encounter/create-encounter.mdx:25 · f6e9f05f
- repositories/platform/mansoq-documentation/versioned_docs/version-3.1/flows/clinical/encounter/create-encounter.mdx:17 · f6e9f05f
- repositories/platform/mansoq-core/mansoq/emr/api/viewsets/encounter.py:149 · f6e9f05f
- repositories/platform/mansoq-core/config/settings/config.py:13 · f6e9f05f